Orangutanion
New Member
- Nov 14, 2025
- 4
- 9
Credit to @klasswhite for writing StarMap!
Right now the community is trying to decide on one community modloader to use. I'm writing this guide both to make the case for StarMap (which is in active development) and just to save new modders time. I will give information both for users and for mod developers.
Part 1: Installing KSA and Starmap
Obviously you need Kitten Space Agency installed. Either install location (

Once you have it downloaded, extract it to its own folder. For instance I have mine in a dedicated

Run

After saving the change and exiting the text editor, run
Part 2: Installing a mod
For this part I will be using StarMapLoader's example
All mods go into

YOU ARE NOT DONE YET. After adding the mod to content, you must additionally add it to
Each new mod will need a new entry.
Now run

Note: for future updates to StarMap you can simply paste the contents of the new StarMap release over your old StarMap install. This is because the default starmap zip doesn't contain the .json file, so it will not overwrite your config file. When uninstalling mods make sure to clear unused entries in
==================== Ignore the rest if you're not a mod dev ====================
Part 3: (for mod devs only) How to make a code mod
I'm including this segment so that people are able to write their own code mods. This way you can make your own mod template and get started. You will need all the previous steps completed, which is why this is at the end. Note that I'm using Visual Studio Community 2026, but the process will be similar for JetBrains Rider.
The very first step is to create a C# Class Library project. Then you want to link to the following dlls:

Next you want to create a
Make sure to set your
You need to make a Personal Access Token (classic) in your Github account with the following perms:

(MAKE SURE TO SAVE THE KEY TO A TEXT FILE OR SOMETHING)
Then you want to include the nuget package. To do this you go Tools > NuGet Package Manager > Package Manager Settings > Package Sources and you then add the package link:

At some point you'll be prompted to log in with your Github username and key from earlier. I hope you saved it.
Now you need to add the NuGet package to the repo. In NuGet Package Manger you can select

Also add the
And now you're off to the races! Currently to actually interface with the game you need the name of the class to be the same as the mod id and then to extend the class
Here is my .csproj, you can find yours by going to solution explorer and double clicking the mod name (the thing directly beneath the solution in the tree). Don't copy mine verbatim as your dll locations are probably different:
Currently with the model for extending the interfaces you want something that starts like this:
Beyond this I recommend reading the files in https://github.com/StarMapLoader/StarMap-ExampleMods/tree/main/StarMap.SimpleMod . Good luck.
Right now the community is trying to decide on one community modloader to use. I'm writing this guide both to make the case for StarMap (which is in active development) and just to save new modders time. I will give information both for users and for mod developers.
Part 1: Installing KSA and Starmap
Obviously you need Kitten Space Agency installed. Either install location (
Program Files or %LOCALAPPDATA%\Programs) is fine. Once you have KSA installed, download the latest release (screenshot is out of date) for StarMap: https://github.com/StarMapLoader/StarMap/releases:Once you have it downloaded, extract it to its own folder. For instance I have mine in a dedicated
ksamodding\StarMapLoader directory:Run
StarMap.exe once. This should create a terminal popup and a new file called StarMapConfig.json. Open that up in your text editor of choice (notepad, vscode, etc.) and put the root KSA directory into GameLocation. Should either be "C:\\Program Files\\Kitten Space Agency" or "C:\\Users\\username\\AppData\\Local\\Programs\\Kitten Space Agency" depending on where you installed the game:After saving the change and exiting the text editor, run
StarMap.exe a second time. If Kitten Space Agency boots, you've done it correctly. You'll need to run it from StarMap.exe in order for code mods to work. I recommend making a shortcut on your desktop to StarMap.exe (and remove any existing shortcuts to the vanilla KSA.exe if you did that).Part 2: Installing a mod
For this part I will be using StarMapLoader's example
SimpleMod: https://github.com/StarMapLoader/StarMap-ExampleMods/releasesAll mods go into
Kitten Space Agency\Content\modname. Core is the vanilla mod. You must set it up so that there exists Kitten Space Agency\Content\modname\mod.toml. The name of the directory is the same name as the name of the mod in the toml file, and for code mods it is the same name as the .dll file. For the example mod, it should be Kitten Space Agency\Content\StarMap.SimpleMod with the following file contents:YOU ARE NOT DONE YET. After adding the mod to content, you must additionally add it to
"C:\Users\username\Documents\My Games\Kitten Space Agency\manifest.toml" (in your Windows Documents folder) like so:
Code:
[[mods]]
id = "Core"
enabled = true

[[mods]]
id = "StarMap.SimpleMod"
enabled = true
Each new mod will need a new entry.
Core is vanilla, and then the id for each subsequent mod is the same as the id in that mod's mod.toml file.Now run
StarMap.exe, enter a world, and hopefully you will see the message from the mod:Note: for future updates to StarMap you can simply paste the contents of the new StarMap release over your old StarMap install. This is because the default starmap zip doesn't contain the .json file, so it will not overwrite your config file. When uninstalling mods make sure to clear unused entries in
manifest.toml.==================== Ignore the rest if you're not a mod dev ====================
Part 3: (for mod devs only) How to make a code mod
I'm including this segment so that people are able to write their own code mods. This way you can make your own mod template and get started. You will need all the previous steps completed, which is why this is at the end. Note that I'm using Visual Studio Community 2026, but the process will be similar for JetBrains Rider.
The very first step is to create a C# Class Library project. Then you want to link to the following dlls:
Next you want to create a
mod.toml in the same directory as your source code and put the mod id like so:
Code:
name = "ExampleMod"mod.toml to Copy to Output Directory: Always Copy.You need to make a Personal Access Token (classic) in your Github account with the following perms:
(MAKE SURE TO SAVE THE KEY TO A TEXT FILE OR SOMETHING)
Then you want to include the nuget package. To do this you go Tools > NuGet Package Manager > Package Manager Settings > Package Sources and you then add the package link:
https://nuget.pkg.github.com/StarMapLoader/index.json:At some point you'll be prompted to log in with your Github username and key from earlier. I hope you saved it.
Now you need to add the NuGet package to the repo. In NuGet Package Manger you can select
Package Source: StarMapLoader:Also add the
Lib.Harmony package.And now you're off to the races! Currently to actually interface with the game you need the name of the class to be the same as the mod id and then to extend the class
IStarMapMod, but this format is subject to change.Here is my .csproj, you can find yours by going to solution explorer and double clicking the mod name (the thing directly beneath the solution in the tree). Don't copy mine verbatim as your dll locations are probably different:
XML:
<Project Sdk="Microsoft.NET.Sdk">
<PropertyGroup>
<TargetFramework>net9.0</TargetFramework>
<ImplicitUsings>enable</ImplicitUsings>
<Nullable>enable</Nullable>
<CopyLocalLockFileAssemblies>false</CopyLocalLockFileAssemblies>
</PropertyGroup>
<ItemGroup>
<PackageReference Include="Lib.Harmony" Version="2.4.2">
<PrivateAssets>all</PrivateAssets>
</PackageReference>
<PackageReference Include="StarMap.API" Version="0.1.5">
<PrivateAssets>all</PrivateAssets>
</PackageReference>
</ItemGroup>
<ItemGroup>
<Reference Include="Brutal.Core.Numerics">
<HintPath>$(LOCALAPPDATA)\Programs\Kitten Space Agency\Brutal.Core.Numerics.dll</HintPath>
<Private>false</Private>
</Reference>
<Reference Include="Brutal.Glfw">
<HintPath>$(LOCALAPPDATA)\Programs\Kitten Space Agency\Brutal.Glfw.dll</HintPath>
<Private>false</Private>
</Reference>
<Reference Include="Brutal.ImGui">
<HintPath>$(LOCALAPPDATA)\Programs\Kitten Space Agency\Brutal.ImGui.dll</HintPath>
<Private>false</Private>
</Reference>
<Reference Include="Brutal.ImGui.Extensions">
<HintPath>$(LOCALAPPDATA)\Programs\Kitten Space Agency\Brutal.ImGui.Extensions.dll</HintPath>
<Private>false</Private>
</Reference>
<Reference Include="KSA">
<HintPath>$(LOCALAPPDATA)\Programs\Kitten Space Agency\KSA.dll</HintPath>
<Private>false</Private>
</Reference>
</ItemGroup>
<ItemGroup>
<None Update="mod.toml">
<CopyToOutputDirectory>Always</CopyToOutputDirectory>
</None>
</ItemGroup>
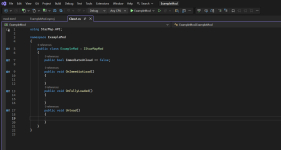
</Project>Currently with the model for extending the interfaces you want something that starts like this:
C#:
using StarMap.API;

namespace ExampleMod
{
    [StarMapMod]
    public class ExampleMod
    {
        [StarMapImmediateLoad]
        public void ImmediateAfterLoad(KSA.Mod mod)
        {
            Console.WriteLine("ExampleMod Immediate After Load");
        }

        [StarMapAllModsLoaded]
        public void AllModsLoaded()
        {
            Console.WriteLine("ExampleMod All Mods Loaded");
        }

        [StarMapUnload]
        public void Unload()
        {
            Console.WriteLine("ExampleMod Unload phase");
        }
    }
}
Beyond this I recommend reading the files in https://github.com/StarMapLoader/StarMap-ExampleMods/tree/main/StarMap.SimpleMod . Good luck.
Attachments
Last edited:


