• ⚠️ Mod Release Rules now apply to this board.

    All mods must include a license, source code (for executable mods), and proper attribution.

    Read the full rules here before posting.

Volumetric exhausts overview and configuration

blackrack

New Member
KSA Developer
RocketWerkz Staff
Sep 30, 2025
4
19
Volumetric exhausts are rendered as discrete individual volumes, each of which has its own emissive, absorbing and scattering components as well as noise and animations.
Rendering​

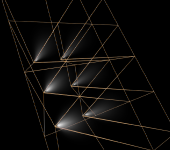
For every exhaust a bounding cone or box is determined inside which the exhaust is raymarched.

1763230414637.png
Example showing plumes and their bounding volumes

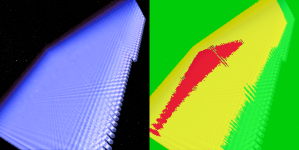
Because raymarching many volumes is expensive, areas of the screen where many exhausts are visible have exhausts rendered at a lower resolution, but edges are preserved.
1763230431937.png
2048 plumes on-screen, left image shows the final result, right image shows a resolution “heatmap”, areas in yellow and in red are rendered at a progressively lower resolution than the area in green

The exhaust system is geared towards handling a large number of partially-absorbing plumes, specific technical choices are made to support this:
  • Exhausts are instanced and rendered all together, without ordering
  • Occlusion and overlapping is handled via approximate order-independent-transparency
  • High instance-count areas of the screen are rendered at low resolution to preserve performance
This allows for a “streaming” approach where the GPU is always working and doesn’t have to pause and read intermediate results between sorted plumes.

This approach may be revised in the future if needed.

Configuration​

Configuration is split into a Template (VolumetricExhaustTemplate) which defines how the plume should look and an instance (VolumetricExhaust) which defines which thruster or engine the plume is added to. Templates should be added to an <Assets></Assets> node to be loaded from mod.toml.
The volumetric exhaust instance is added directly to the Thruster or Engine nodes.

This section will focus on configuring templates.

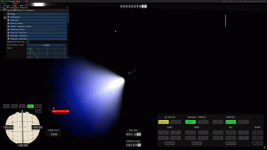
All the settings can be tweaked in-game from the debug UI (accessible with the terminal command Exhaust which can let you tinker and see what the settings do.

Shape​

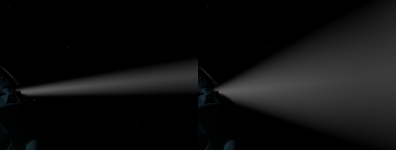
Controls the shape of the plume. The plumes are a truncated cone, changing the settings can change the truncated cone into a regular cone or a cylinder.
  • StartRadius: Defines the initial width of the plume at its base
  • ConeHalfAngle: Controls the expansion angle of the plume, in degrees1763230491587.png
Different angle settings
  • Length: Specifies the total distance the plume extends from its start point
Modifiers for throttle/pressure and startup animations can affect all of these settings except the start radius which remains fixed.

Exhaust​

  • ExhaustSpeed: In m/s, controls how fast the plume moves in space, which can be seen when noise, or animated density/angle changes move through the plume.

Absorption​

Controls the light absorbing/scattering part of the exhaust, some settings exist here for artistic control of the plume look and to better match RCS references.
  • Density: The density of the plume, affects both its absorption and brightness, as well as its ability to self-shadow (a separate setting to tune self-shadowing samples exists) this density falls off radially from axis, and from the start of the plume.
    1763230523593.png
Different density settings
  • DensityFallOffPower: Controls how quickly the density falls off from the start of the plume towards the end
  • ScatteringBrightness: The brightness of the scattering part
  • PhaseEccentricity: Controls how the brightness of the plume changes based on the viewing angle relative to the light source. High values make the plume very bright when looking towards the sun but difficult to see otherwise, low values make the brightness more uniform with light directions.
  • InnerConeSize: The size of a second denser region inside the plume, from the axis of the plume to the outside, this serves to give a more interesting visual look to plumes, values between 0-1
  • InnerConeDensity: The density of the denser region
    1763230545814.png
Different inner cone settings
  • CoreDensity: The density of a denser region at the start of the plume, from the emitter
  • CoreFallOffPower: How quickly the core density falls off
    1763230572136.png
Different core density/falloff settings

Emission​

Controls the emissive part of the plume
  • CoreLength: Controls the length of the emissive part relative to the total plume length, 0-1 values
  • CoreHeight: Controls the height/radius of the emissive part relative to the total plume height, 0-1 values
  • Brightness: The brightness of the emissive part
  • ColorGradient: 4 colors defining a gradient for the emissive part
  • Flow
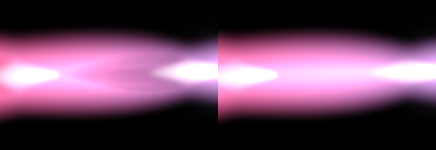
    • PressureWaves:Creates the visual effect of shock waves traveling through the exhaust. Mach diamonds will appear on the areas of high pressure (but can be offset, see mach diamonds below)
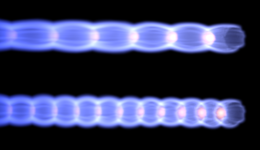
      • Periods: How many areas of high and low pressure over the entire length of the plume
        1763230599492.png
Different period settings

  • Overlap: How connected or separate the pressure areas appear

    1763230622508.png
Overlap 0.6 vs 0.0
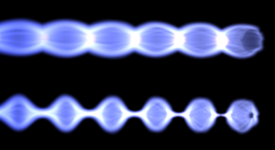
  • Deformation: How much the pressure waves deform the plume
    1763230885719.png
Top: with deformation. Bottom: without

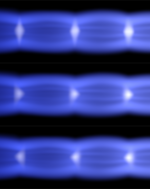
  • GradientStrength: Fades out the deformation progressively over the length of the plume
    1763230990277.png
Top: with fade. Bottom: Without​
  • StartOffset: Offsets the deformation phase towards or away from the emitter
 
  • MachDiamonds:Controls the appearance of mach diamonds
    • Brightness: The brightness of the mach diamond
    • Color: The color
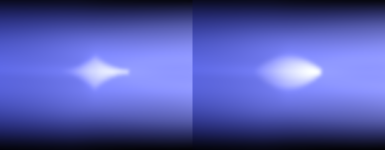
    • Length: Length of the mach diamond, 0-1 values relative to one period of the pressure waves
    • Height: Height of the mach diamond, 0-1 values relative to emissive core’s height
    • Offset: Offsets the mach diamond position from the location of high pressure
    • Shape: Shape of the mach diamond, diamond, cone or backwards cone​

1763231150950.png
Mach diamond shapes
  • Concavity: Adjusts how concave the diamond shape is
    1763231207941.png
  • TipSoftness: Controls the pointiness of the tip
    1763231213171.png
  • EdgeSoftness: Controls how soft or sharp the edges are
    1763231217135.png
  • FadePosition: Controls if the mach diamond should fade in or out along the length
    1763231222087.png
  • Ridge: The ridge is a way to make the outside of the plume more pronounced as to create a visual edge, it has settings to control the scale and sharpness, can also be disabled depending on the ambient pressure (Left: with ridge. Right: without)1763231226979.png
  • Trough: The trough is the area of decreasing pressure behind the mach diamond and has settings to control the scale, shape and brightness. can also be disabled depending on the ambient pressure(Left: With trough. Right: without)
    1763231232555.png
  • TroughAndRidgeGradientStrength: Fades the trough and ridge out along the length of the plume

Noise​

  • DensityNoise: Noise that changes the density of the plume over time, also moves through the plume with the exhaust velocity. This makes the plume look less static without changing the shape.
  • ShapeNoise: Noise that changes the shape of the plume over time, different values are used depending on the angle so this noise is not symmetrical1763231239209.png
  • RadialShapeNoise: Similar to the above but the same value is used at any given point along the length, when combined with the previous noise at a different speed this makes it look more interesting and less steady.

Transients​

Transients allow properties of the plume to be animated for a startup sequence (when a pulse is initiated/stopped or an engine is ramping up/down). Note that geometric properties like angle/density and velocity will travel down the plume, meaning that if the angle expands or contracts during the sequence it’s possible to see different areas of the plume being “pinched”

  • Startup:The transient for a startup sequence
    • Duration: The duration of the sequence
    • AngleCurve: A spline curve modifying the angle over time, this is a multiplier over the angle setting defined in shape
    • DensityCurve: A spline curve modifying the density over time, this is a multiplier over the density setting defined in absorbption
    • VelocityCurve: A spline curve modifying the exhaust speed over time, this is a multiplier over the exhaustSpeed setting. Notice that this will change how long the exhaust moves and how long it takes to clear the same area of the plume.
    • EmissiveSizeCurve: A spline curve modifying the emissive size, this is a multiplier over the emissive core height and length.
  • Shutdown: Same as above but for shutdown
1763231446639.gif
RCS pulses using startup and shutdown transients​

Modifiers​

Similar to transients, a set of splines modifying properties based on the atmospheric pressure or the throttle, combines with transients.

  • Pressure
    • AngleCurve: Changes the plume angle based on atmospheric pressure
    • PlumeLengthCurve: Changes the plume length based on atmospheric pressure
    • MachDiamondBrightnessCurve: Changes the mach diamond brightness based on atmospheric pressure, use to fade/transition-out mach diamonds when atmospheric pressure drops
    • TroughAndRidgveVisibilityCurve: Similar concept for the trough and ridge
    • PressureWaveDeformationCurve: Similar concept for the pressure waves
    • AbsorptionDensityCurve: Changes the absorption density
    • ConcavityCurve: Changes the concavity of the plume
  • Throttle:Similar settings to the above respoding to throttle
    • AngleCurve
    • PlumeLengthCurve
    • MachDiamondBrightnessCurve
    • TroughAndRidgveVisibilityCurve
    • PressureWaveDeformationCurve
1763231469649.gif
Throttle and pressure modifiers in action​

Quality​

A very important section to tune for performance
  • SampleCount: Raymarching sample count for the plume, for performance try to keep this as low possible where you don’t see noise or artifacts
  • SelfShadowSampleCount: Number of samples to raymarch towards the light, only use this on thick absorbing plumes where this makes a difference, keep it as low as possible as this is very expensive
  • VolumetricVesselShadows: If the plume should receive vessel shadows, this is expensive so don’t use it on purely emissive plumes
  • NonLinearSampling: Will distribute samples so that more samples will be taken closer to the camera, this is meant to be used with very thick absorbing plumes but in practice is not very useful

Debug UI​

You can bring up the debug UI with the terminal command Exhaust which can let you tinker with all the previous settings and see what the settings do.

Test grid​

Additionally the debug UI lets you spawn a test grid of up to 2048 plumes of any type in front of the camera.
 
Last edited:
The colors and shapes make it almost feel like a sort of kaleidoscope simulation if you mirrored everything right. Very cool!
 
Impressive stuff !

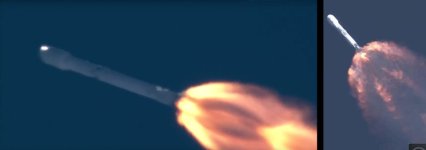
If I understand correctly, the modifiers like "AngleCurve" and "PlumeLengthCurve" should help create plumes that aren't a perfect triangle, but make it more round/convex like these that often appear at high altitude ?
170625-spacex-3.jpg
 
WOW. Amazing insight into your work blackrack. Is it planned to have multeple plumes close together merge into one like seen during Starship launches?